Attention! Helicon Tech Blog has moved to www.helicontech.com/articles/

Showing posts with label mod_cache. Show all posts

Wednesday, May 12, 2010

Automatic cache cleaning in Helicon Ape

Up to version 3.0.0.39 Helicon Ape cache could be cleaned only manually. Memory-based cache (mod_mem_cache) required recycling of corresponding application and disk-based cache (mod_disk_cache) cleaning implied manual files deletion form the file system. That was slightly inconvenient, to put it mildly.
Helicon Ape 3.0.0.39 (and newer) got support of cache cleaning upon request.
Now, to clean cache just set the cache-clear environment variable. This will cause cache cleaning corresponding to the current request (context).

Setting cache-clear variable using SetEnvIf directive provides flexibility of conditions that will lead to cache cleaning.

For example, to trigger cache cleaning by requesting specific URL:
SetEnvIf request_uri ^/system/cache/clear/$ cache-clear=1
To trigger cache cleaning by appending specific query string value:
SetEnvIf Query_String clear_cache_request cache-clear=1
For security purposes it may be necessary to clean cache only from definite IP address:
SetEnvIf (Query_String clear_cache_request) and (Remote_Addr 11\.22\.33\.44) cache-clear=1
Cache cleaning may take some time, so be ready.

When cache cleaning is over, the error.log (with info or higher verbosity level) will display the number of deleted records.

Best regards,
Ruslan, Anton - Helicon Tech Team

Wednesday, January 21, 2009

Guide: Example of mod_cache application

In the previous articles we told you what cache is and how it works in Helicon Ape. Now it’s time to use obtained knowledge in practice. Today we gonna apply caching for PHP application called qdig that helps organize images web-gallery. Read how to register PHP on IIS7 in our article about WordPress.

Creating online photo album

Let’s create photos folder in site root and fill it with our photos. Now we are downloading qdig. To make it simpler we’ll extract only one index.php file and put it into the same directory.


The gallery is already working: http://localhost/photos/index.php

Measuring performance

To measure request rate we’ll use ab.exe application:
ab.exe -n 200 -c 2 "http://localhost/photos/index.php?Qwd=.&Qif=DSC00410.JPG&Qiv=name&Qis=M"
The result is a bit more than 16 requests per second.

Switching on mod_cache and mod_expires

To enable necessary modules, let’s uncomment the following lines in Helicon Ape httpd.conf file:
LoadModule expires_module    modules/mod_expires.so
LoadModule cache_module modules/mod_cache.so

Analyzing cached request

To make mod_cache cache not all requests but only unique ones, let’s figure out what qdig request parameters mean and how request uniqueness depends on them:
  • Qwd - folder where image files reside - AFFECTS request uniqueness;
  • Qif - file name - AFFECTS request uniqueness;
  • Qiv - mode of file names representation - AFFECTS request uniqueness;
  • Qis - image size - DOESN’T AFFECT request uniqueness;
  • Qtmp - representation mode - DOESN’T AFFECT request uniqueness;
Thus, cache key will use only Qwd, Qif and Qiv parameters.
The piece of config for mod_cache will look like:
<Files index.php>
CacheEnable mem
CacheVaryByParams Qwd Qif Qiv
</Files>

Expiration time

index.php script does not set Cache-Control and Expires headers, but, as we already know, they are really important for successful caching. So we’ll set these headers by ourselves. And for that purpose we’ll use mod_expires functionality:
ExpiresActive On
ExpiresByType text/html "access 1 hour"
Above directives set expiration time to 1 hour.
The resulting .htaccess is as follows:

Measuring performance once again

ab.exe -n 200 -c 2 "http://localhost/photos/index.php?Qwd=.&Qif=DSC00410.JPG&Qiv=name&Qis=M"
And now the result is about 94 requests per second!

That’s all you need to do to achieve sixfold performance growth.
This example clearly demonstrates the ease and efficiency of Helicon Ape caching feature.

Monday, January 12, 2009

How mod_cache works?

Helicon Ape release (coming very-very soon) will contain mod_cache module. And as we promised in our previous article we are now giving you more thorough description of mod_cache operation.

mod_cache starts working

After authentication/authorization events but prior to request handler execution mod_cache comes out on the scene. At this stage the module performs the following:
  • checks whether it's possible to use cached response for the current request
  • if yes, generates a key and searches cached response using this key
  • if the response is found in cache, the module gives it back to the client and request processing is over — request handler is not invoked.

Cacheable or not cacheable: request check


Response may be cached if request meets the following requirements:
  • request method is GET
  • request does not contain Authorization header
  • Cache-Control request header must not be no-cache. This condition is ignored if CacheIgnoreCacheControl On is used
  • Pragma request header must not be no-cache. This condition is ignored if CacheIgnoreCacheControl On is used

mod_cache attempts to save response

When request handler has completed its job and all defined filters have been applied to response, mod_cache starts to operate. At this stage the module performs the following:
  • estimates the capability of response caching
  • checks if CacheEnable is set for this request
  • generates cache key
  • defines the period of time to store response in cache (absolute expiration time)
  • saves response in cache according to the key

Cacheable or not cacheable: response check


The following conditions are considered when deciding whether response is cacheable (all must be met at a time):
  • request method is GET
  • response status is 200 (200, 203, 300, 301 or 410 in Apache)
  • Expires response header contains valid "future" date
  • responses containing expiration time (i.e. Expires or Cache-Control: max-age=XX headers), Etag header or Last-Modified header. This condition is ignored if CacheIgnoreNoLastMod is used

    • if request has a QueryString, only those responses containing expiration time are cached (i.e. Expires or Cache-Control: max-age=XX headers). This condition is ignored if CacheIgnoreQueryString On is used
  • Cache-Control request header must not be no-cache. This condition is ignored if CacheStoreNoStore On is used
  • Cache-Control request header must not be private. This condition is ignored if CacheStorePrivate On is used
  • request does not contain Authorization header (for Apache: if Cache-Control contains s-maxage, must-revalidate or public)
  • Vary response header does not contain "*".

Cache key generation

Response is saved in cache according to the key. This key includes:
  • normalized (canonical) request URI without QueryString or, in case of proxy request, normalized proxy request URL;
  • all QueryString parameters and their values in alphabetical order (default behavior)

    • CacheIgnoreQueryString On directive cancels addition of request parameters to the cache key
    • CacheVaryByParams param1 param2 ... directive defines parameters to be included into cache key
  • all request headers specified in CacheVaryByHeaders header1 header2 ... directive. Headers are not included to the cache key by default.
  • If response contains Vary header, all request headers specified in it are included into cache key.

When cached response dies

HTTP response is stored in cache for a specific period of time that is computed in the following way:
  • If response contains Expires header and its value is valid and does not refer to the past, cached response will be stored till the time specified in it.
  • If response contains Cache-Control header with either max-age=X or s-maxage=X, cached response will be stored in cache for X seconds.
  • If response contains Last-Modified header, cached response will be stored in cache until: expiry date = date + min((date - lastmod) * factor, maxexpire), where date - current date, lastmod - value of Last-Modified header, factor - float value set via CacheLastModifiedFactor directive (default value = 0,1), maxexpire - value set via CacheMaxExpire directive (default value = 86400 seconds = 1 day).
  • If mod_cache was unable to calculate expiration date using one of aforementioned methods (this is possible if response doesn't have Expires, Cache-Control, Last-Modified headers BUT has Etag header), it (date) is equated to default value of 1 hour that may be reset using CacheDefaultExpire directive.
This load of text might look a little unclear for you at a glance, but in reality this is a well-composed and highly efficient scheme. And our upcoming article will convince you in this.

Friday, January 9, 2009

Web Caching: what is it?

What is that and what’s it for?

Web cache is a vital instrument to build lightning-fast web apps. Web cache stores HTTP responses that may be provided to the user without making a request to the server, i.e. no ASP/PHP scripts execution and database queries are necessary. And that’s cool!
Web-caching allows to substantially reduce response time — time the server needs to give the response — as reading from cache is much faster than processing request with PHP handler.
Web-caching minimizes traffic — if one uses intermediate caches (gateway or proxy cache), request won’t reach the origin server — response will be given back by an intermediate caching server.

Cache breeds

Server cache

This cache works on the origin server. Applications and server itself use it to store parts of responses (e.g. web pages) or complete responses. Server cache may be used on application (e.g. memcached + php or HttpRuntime.Cache + ASP.NET) or HTTP server level (e.g. mod_cache in Apache, OutputCache in IIS7).

Proxy cache

It lives between clients and origin servers and may only store public representations that do not require authorization (unlike private representations). Proxy cache is widely used by providers to reduce traffic.

Browser cache

It lives in browser and is capable of storing private data. Browser cache is used for example for Back button operation.

How does Server Cache work?

Cacheless configuration

Cacheless configuration forces server to process each incoming request and generate new response even if the same resource is requested several times running. That is senseless time- and resources-consuming operation that puts excessive load on the server.

First request to cache-enabled server

When the specific resource is requested from the server for the first time caching system checks if it’s possible to cache the response, then it looks for response in cache and fails to find it. Request moves further along the server pipeline triggering necessary handlers and filters. When the response is ready caching system saves it to cache before sending to the client.

Subsequent requests to cache-enabled server

Upon further requests to this resource caching system checks if it’s possible to cache the response, then it looks for response in cache and this time finds it! Then the response is retrieved from cache and sent to the client. And that’s it! No server handlers and filters are executed.
Responses are stored in cache for a certain period of time. When this time elapses cached response is labeled as not valid and is removed from cache. Next request to that same resource is processed as if it is requested from the server for the first time (see “First request to cache-enabled server’).

Conclusion

As you could see, Server Cache favors lower server load and faster response time. In the next article concerning cache we’ll give more thorough explanation of this process and illustrate it with examples.

Wednesday, December 24, 2008

Guide: Tuning Wordpress with Helicon Ape on IIS7 (permalinks, browser/server caching, compression)

Wordpress is a highly popular and rapidly growing open source CMS providing powerful blog-designing facilities. Accounting for its popularity we decided to write an article in which we'll show how to optimize, speed up, prettify Wordpress operation using Helicon Ape. So, let's start.
Prerequirements: Windows 2008/Vista, IIS7, FastCGI, Helicon Ape

Step 1. MySQL

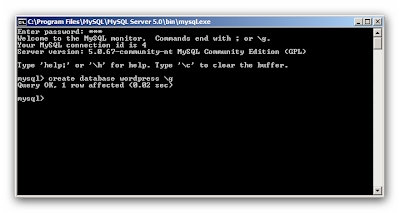
After MySQL installation run MySQL Command Line Client and execute the following command:
create database wordpress;

Step 2. PHP

Install PHP into C:\inetpub\php to inherit NTFS permissions of IIS directory. It is of importance that C:\inetpub\php\php.ini contained the following directives:
magic_quotes_runtime = Off
extension_dir = "C:\inetpub\php\ext\"
extension=php_mysql.dll
After ensuring the directives are in place you need to register PHP in IIS configuration. To accomplish this:
  • open IIS Manager
  • open Handler Mappings snap-in
  • press 'Add Module Mapping' and fill the fields in the opened window in accordance with the next screenshot (all images are clickable)

Step 3. Wordpress

Download the latest Wordpress version
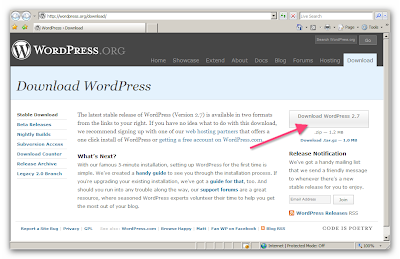
Unzip the package into C:\inetpub\wwwroot\wordpress
Rename wp-config-sample.php into wp-config.php.
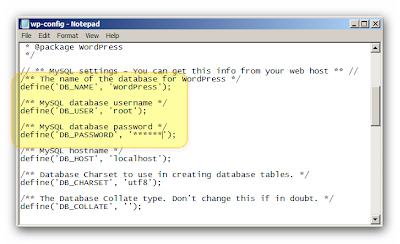
Adjust MySQL connection:
Create a blog
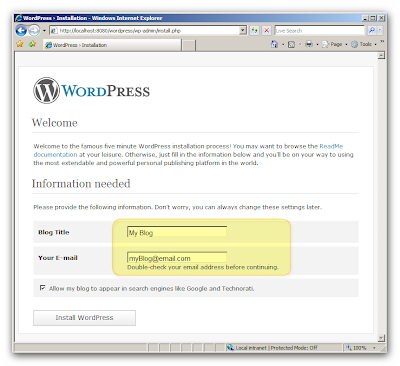
Now in Administrative panel you can set SEO-friendly format for your links, e.g: /%post_id%/%postname%
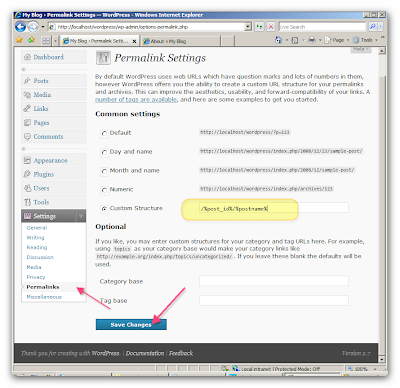
Your links will now look like http://localhost/wordpress/2008/uncategorized/hello-world
instead of http://localhost/wordpress/?p=123. If you now attempt to access any of the pages on your blog,
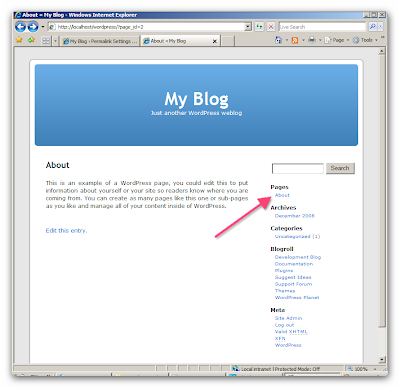
you'll get 404 Not Found error
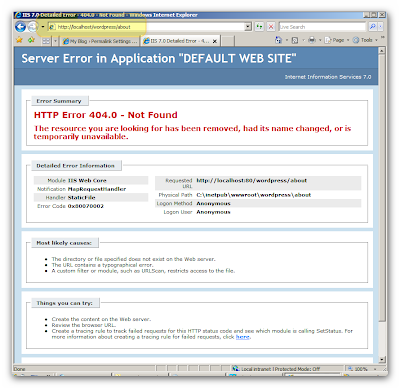
And that is defenitely not the desired result!

Step 4. Helicon Ape

It's time to fix the above inconveniences and accelerate Wordpress.
We'll use the following Helicon Ape modules:

4.1 mod_rewrite

It'll assist us in handling SEO-friendly URLs.
Open Helicon Ape Manager and uncomment/add the following line in httpd.conf to enable mod_rewrite:
LoadModule rewrite_module  modules/mod_rewrite.so
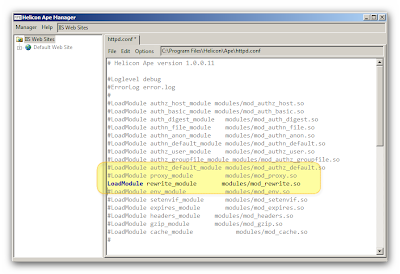
Now in Helicon Ape Manager browse to Wordpress folder and put the following code to .htaccess:
RewriteEngine On
RewriteCond %{REQUEST_FILENAME} !-f
RewriteCond %{REQUEST_FILENAME} !-d
RewriteRule . index.php [NC,L]
This piece of code checks whether the requested resource is physically located on the disk and if it doesn't, performs rewriting to index.php.

Save changes to .htaccess. Request any blog page once again... It works!

Yes, it does... but not the best way... So we are moving on! 'Cause only the best is good enough:)

4.2 mod_expires: client/proxy content expiration

With this module we'll adjust browser cache so that the browser doesn't send excess requests to the server. Go back to httpd.conf in Helicon Ape Manager and uncomment/add the following line:
LoadModule expires_module  modules/mod_expires.so
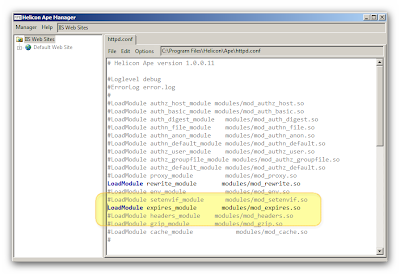
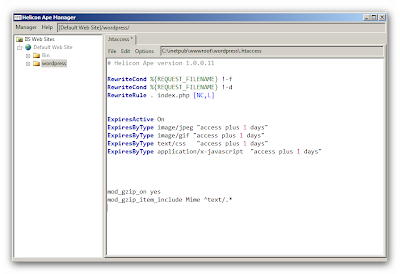
Subsequent lines (being put to .htaccess) will tell browser cache that images, css and JavaScripts must not be requested from the server (but rather taken from cache) within 1 day after retrieving resource for the first time:

ExpiresActive On
ExpiresByType image/jpeg "access plus 1 days"
ExpiresByType image/gif "access plus 1 days"
ExpiresByType text/css   "access plus 1 days"
ExpiresByType application/x-javascript  "access plus 1 days"

Let's check what's changed. The first request grabs all page resources and for each image, css and JavaScript sets the header Cache-Control: max-age=86400


Upon consequent requests to that page the browser does not ask for images, css and JavaScripts from the server but takes them from the cache until max-age expires.


4.3 mod_gzip

Are you enjoying the process? Then let's implement the next stage. To make things even better, let's apply on-the-fly compression that will reduce traffic and speed up page load. In our irreplaceable Helicon Ape Manager please uncomment/add the following line inside httpd.conf:
LoadModule gzip_module  modules/mod_gzip.so
And put the following lines into .htaccess in Wordpress folder:
mod_gzip_on yes
mod_gzip_item_include Mime ^text/.*
These directives instruct Helicon Ape to compress only those resources which type starts with "text/", i.e. all text, .html and .css files. Usually images and video compression is useless.
Uncompressed page had Content-Length: 5152, the same page after compression became as small as Content-Length: 2168. So, we've managed to reduce the amount of info to be transferred almost twice.


4.4 mod_cache

We are coming to the final and in conclusion we'll enable server-side caching. Instead of requesting the same page from the server again and again Helicon Ape saves the copy of server response and fires with it when corresponding page is needed.
Uncomment/add the following line in httpd.conf (using Helicon Ape Manager):
LoadModule cache_module  modules/mod_cache.so
We'll only cache index.php page. It will be stored in cache for 30 seconds so that the site looked dynamic. There's no need to cache static files (.html, .css, images, Flash, videos) because IIS processes them really fast.
Note! It is worth mentioning that cache distinguishes query string parameters, thus it will store different snapshots for different blog pages.
There are some shortcomings of this type of caching (semi-dynamic web application). E.g. if the user posts a comment on the blog, it will see the result (his post) immediately, but another user browsing this page will only see it in 30 seconds (after cache expires). This issue may be resolved by reducing the time snapshot lives in cache, but it should nevertheless be taken into account.
Put the following lines into .htaccess in Wordpress folder:
<Files index.php>
ExpiresByType "text/html; charset=UTF-8" A30
CacheEnable mem 
CacheVaryByHeaders Original-Url 
</Files>

Let us compare the productivity with and without cache. On our testing virtual machine we've obtained the following values:
  • without cache - 7.45 requests per second


  • with cache - 711 requests per second!


4.5 mod_headers

The last drop we want to add to our Wordpress-based dish will hide IIS from robots and scanners.
You need to uncomment/add the following line in httpd.conf:
LoadModule headers_module  modules/mod_headers.so
And put the only line into .htaccess:
Header set Server "Apache/2.2.9 (Unix)"
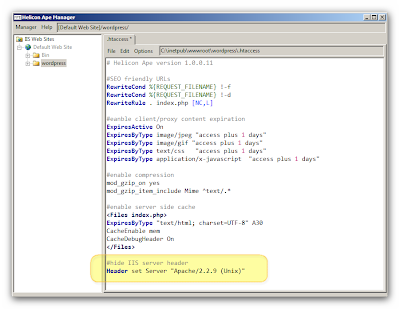
Now our IIS appears to the world like


Congratulations to everyone who came to finish! It's all done now! Enjoy flawless and fast Wordpress operation and stay with us!
Best regards,
Helicon Team.