Attention! Helicon Tech Blog has moved to www.helicontech.com/articles/

Friday, November 13, 2009

Helicon Ape remote management using IIS 7

Management on local machine

After installation of Helicon Ape (Full or Free Edition) on Windows 2008 Server or Windows 7 you have a possibility to edit httpd.conf and .htaccess files directly in IIS Manager in the same way as in Helicon Ape Manager.


To edit particular .htaccess file select the corresponding folder in the sites tree and double-click on Helicon Ape icon. To configure httpd.conf select the tree root (usually having the host name).


Helicon Ape snap-in empowers you to manage not only configuration files but also licenses via License Manager available in Help -> License Manager.

Management on remote server

In IIS 7 the remote administering functionality was introduced. It became possible to manage IIS on remote server from local machine even with Windows XP on it. Here's the Microsoft story about it.

Let's have a closer look at this function.
Capabilities of remote IIS Manager are outlined here. IIS Manager itself may be downloaded here.


  1. Having the IIS Manager installed, run it.
  2. Select 'Connect to a server...' option if you need to connect to the whole server or 'Connect to a site...' if you want to connect to a particular site.
  3. Input the desired host name, access credentials.

  4. If you use self-signed certificate, you will get a warning message expressing concerns on whether this cert may be trusted or not. Be persistent and press 'Connect' button.
  5. After that IIS Manager will suggest to download Helicon.Ape.Editor.dll from the server to make remote Ape management possible. Accept this prompt.

  6. Now you have Ape snap-in for the server/site running locally. And you can manage configuration files (httpd.conf, .htaccess) and licenses (in License Manager) as if working directly on the server.

Summing up it's worth mentioning that this remote management functionality may be particularly useful for shared hosting clients as they get an opportunity to handle their site(s) by themselves without having to bother the server administrator on the slightest occasion.

Best wishes,
Ruslan, Anton - HeliconTech Team

Helicon Ape 3.0.0.29 released

Just wanted to let you know that we have slightly improved Ape 3 and released a new build - 3.0.0.29. The enhancements relate to incorrect snap-in and License Manager behavior in certain situations and address improper installation package actions under specific conditions.

Feel free to download.

Best wishes,
HeliconTech Team

Wednesday, November 11, 2009

Guide: Helicon Ape License Manager

In this article we are going to shed some light on the licensing policy implemented in Ape 3 and tell about its new feature—License Manager.

We'll review each of the possible license types so you could opt for the one that best fits your needs.

To start with, there are two distinct installation packages supporting various license types:
  • Full (including 45-day trial)
    • free licenses
    • per-site licenses
    • server-wide license
  • Free (gratis for up to 3 sites only)
    • free licenses

1. Full version


Free licenses

Ape 3 has obtained a new license type—Free. From now on you can use Ape for up to 3 sites at no cost.
To use Ape on up to 3 sites absolutely free choose Free mode during installation.


After installation process is over, run Helicon Ape Manager and open Help -> License Manager to specify the sites for which free licenses will be used. To do that Per-site licensing policy should be selected. In the list of sites you must tick the sites (up to 3!) you want Ape to work for free for and press "Enable free license" button.


Per-site licenses

If you need more than 3 sites to use Ape, you can either buy individual per-site licenses or (if you want Ape for a bunch of sites) buy a server license (see the next sub-item).

Having bought a per-site license you just run the License Manager, and being in Per-site mode tick the site you want this license for and press "Enable License". You'll be offered to enter the registration data and press "Enable". After that, assuming your credentials are correct, Ape will be enabled for the chosen site.

Server license

If you have a large number of sites to use Ape, it's more appropriate (and economically efficient) to register Ape for entire server. This means all sites on this server will be able to use Ape when properly configured.

To register Ape on entire server select Server License mode in License Manager and enter registration credentials when prompted. Then necessarily press "Apply" button.


Note! If you want to test Ape on your entire server prior to buying it, you may select "45 Day Trial" mode during installation and enjoy it for 45 days period at no cost without functionality limitations.

Note! If you selected "I have a key" licensing option during installation and now have Ape registered for the entire server, transition to Free license mode will no longer be available for you as it just doesn't make sense.


Notice that License Manager is just a handy tool and licenses may also be set manually in Helicon Ape Manager by editing licenses.conf file.

To apply free Ape licenses to 3 specific sites the following directive should be written:
FreeSites id#1 id#100001456 id#789
where the numbers represent sites' IDs in IIS.

To add a per-site license for specific site having ID=1 in IIS the following structure should be used:
<VirtualHost id#1>
RegistrationName= Name
RegistrationCode= Code
</VirtualHost>

The server license is enabled in a similar way but without VirtualHost tags:
RegistrationName= Name
RegistrationCode= Code

2. Free version


Alternatively to installing Helicon Ape Installation Package you may choose Helicon Ape Free Installation Package to use Ape on up to 3 web sites absolutely free without opportunity to by additional per-site or server licenses.

But not to worry, if once you need to use Ape for more sites and want to upgrade, you can do that by clicking "Update to Full version" button in License Manager.


This article was aimed to cover all Helicon Ape licensing capabilities which are rather flexible and let you benefit from using the most appropriate one.

Best wishes,
Anton, HeliconTech Team

Monday, November 9, 2009

Helicon Ape 3 Release

New version of Helicon Ape has recently been released!

It offers:
  • free use on up to 3 sites;
  • 30+ Apache-like modules;
  • admin-free installation on shared hosting;
  • improved performance;
  • redesigned, easier-to-use manager;
  • license manager

Test Ape 3 for free during 45 days.
Looking forward to your feedback.

P.S. New articles on Ape 3 features are coming soon. Stay tuned!

Friday, October 30, 2009

From the inside: ISAPI_Rewrite x64 installation on Windows 2008 Server x64

Installation of ISAPI_Rewrite x64 on Windows 2008 Server x64 may seem a trivial task and it really is of that kind, but nevertheless we'd like to show you the steps installer is making so you could fix possible (though unlikely) problems.

First of all ISAPI_Rewrite installer ensures that ISAPI Filters and ISAPI Extensions components are installed in IIS.

This done installation starts (proper installation package may be downloaded here; it's called ISAPI_Rewrite3_00xx_x64.msi).
Then proxy handlers are registered in Handler Mappings snap-in.

Two records must be added: Helicon Proxy_32 and Helicon Proxy_x64:

After that ISAPI_Rewrite filters are registered in ISAPI Filters snap-in:

You must see these two filters in the list: ISAPI_Rewrite_32 and ISAPI_Rewrite_x64:

Installer also adds ISAPI_Rewrite proxy dlls (both x86 and x64) into the list of ISAPI and CGI restrictions

and marks them as Allowed.

That's all that is done by installer or (in a rare case when it fails) by you:) Now you may test ISAPI_Rewrite operation using this simple rule:
RewriteRule .? – [G]

Save the config and make request to any page on your site. "Gone" result will evidence successful installation:


Now let's turn on 32-bit applications compatibility mode (if you need to).
Click on the Application Pools node in IIS Manager:

And go to Advanced Settings of DefaultAppPool:

Set "Enable 32-Bit Applications" parameter to True:

And test if ISAPI_Rewrite still works with the same rule and URL you used above. The result should be just the same:

We find it quite helpful to know what's happening behind the scenes. And hope you also do.
Take care.

Regards,
HeliconTech Team

Thursday, October 22, 2009

Titbits: ISAPI_Rewrite double registration

Hello!

We have decided to start a series of little titbits about our software. You may find them interesting
and helpful.

Today we're gonna explain you what the “double registration” term means. It's a typical situation on our support when a user can't get ISAPI_Rewrite working while everything seems great, NTFS permissions are OK, the rules are the simplest ever but still no go.

In these cases we commonly ask the user to provide their IIS metabase.
On Windows 2003 Server you may find it here: C:\windows\system32\inetsrv\metabase.xml.
Windows 2008 provides another configuration model and we ask for C:\windows\system32\inetsrv\config\applicationHost.config.

Generally, double registration means simultaneous registration of ISAPI_Rewrite.dll on two different levels. “Web Sites” tree node is what we call “global level”. If you have ISAPI_Rewrite registered here, you will have the tool working for every web-site on your server. Saying “local level” we imply particular web-site.

So the point is you must have only one type of the registration — either on the global level, or on one or several local levels (to enable ISAPI_Rewrite for one or several sites respectively).

Within IIS metabase a double registration issue looks as follows:
<IIsFilter Location ="/LM/W3SVC/1800802984/filters/ISAPI_REWRITE"
  FilterPath="C:\Program Files\Helicon\ISAPI_Rewrite3\ISAPI_Rewrite.dll"
 >
</IIsFilter>

<IIsFilters Location ="/LM/W3SVC/Filters"
  AdminACL="49634462f0000000a400000040000000b171b2f1d344c28255ce51e983b630fed611621d5ecedb78dbe4d4cf30d63e00bb48ac0f5f50c7ecafaf6a3bc3de47b88f801eff2a1c5deda33ad14d7970891db279691971967ed7214857d1b7393ed14cb23e0c248b389f1ad5ebd7b467ef0a0f510a4a967021f12c840c0097ca7e01c449811791c3abf7594c4a61b16498d62dd88d97ac2773ca613785a820f796656421ec2a2780f31897832216525befc0e505582a3377e9928d3ace3b5c59dc00020ee64908c1d1f355776fb12408b349f691ef5761086a5b81869459e2f34e03772da0fb49dc45b8c0d7c1c12c4a252d51e69ce79bb7342d"
  FilterLoadOrder="ASP.NET_2.0.50727.0,ISAPI_Rewrite3"
 >
</IIsFilters>
If you selected automatic installation of ISAPI_Rewrite you would have the tool registered globally. Here is an example:


The next screenshot demonstrates correct local registration, which you can't get from the installation wizard, but should perform manually:


This is it. We've described the very gist of double registration and hope you won't have such misconfiguration on your system.

Yours sincerely,
Helicon Tech team.

Friday, September 4, 2009

From the inside: Installation of ISAPI_Rewrite3 x64 on Windows 2008 Server x64

We've decided to write this article, because sometimes knowing internals of what's happening to your server is beneficial and may save time and nerves.

This story may be used for two purposes:
1) to learn what's happening to your system when ISAPI_Rewrite is being installed;
2) to follow the steps outlined in the article to make sure ISAPI_Rewrite was installed correctly (in case you have any concerns or something is not working as expected).

If you already have strong desire to install ISAPI_Rewrite, firstly, please check if your IIS Server contains all required components, especially those stressed on the picture:
If it's OK, it's high time to download and install the latest build of ISAPI_Rewrite x64 available on our site.
After that make sure ISAPI_Rewrite is registered in IIS. To accomplish this:
  • open IIS Manager
  • open Handler Mappings snap-in
  • Check if required handlers are there
  • open ISAPI Filters snap-in
  • Check if required filters were added (see the pic)
  • Open ISAPI and CGI restrictions snap-in
  • Check if required restrictions were added and set as Allowed
Now launch ISAPI_Rewrite Manager and write the following test rule in httpd.conf:
RewriteRule .? – [G]
Make request to any resource you can think of to check if ISAPI_Rewrite works fine.
If the result resembles the one above (410 Gone page), ISAPI_Rewrite operates correctly.

Now we will turn on 32-bit applications compatibility and check if everything is still working great:
  • open IIS Manager
  • go to Application Pools
  • choose DefaultAppPool and Advanced Settings
  • Set “Enable 32-Bit Applications” parameter to True
  • Now check ISAPI_Rewrite operation once again by making some request in the browser
  • The result should be the same as before (410 Gone). This means that ISAPI_Rewrite works just fine in 32-bit compatibility mode.

We've tried to be as explicit and clear as possible and hope this tour around your server's settings will help you some day.

Regards,
HeliconTech Team

Monday, August 31, 2009

Helicon Ape mod_proxy: proxy-server inside IIS

What is proxy-server?

Proxy-server is a network service empowering clients to perform indirect requests to other network services. Proxy-server may be considered an intermediary. The brief description of proxy-server operation is as follows:

  • client connects to proxy-server (front-end server)
  • asks proxy-server for some resource located on another server
  • proxy-server connects to the specified server (back-end server)
  • gets requested resource
  • gives out resource to the client

And the client may be ignorant that the requested resource was delivered from another server.

What is HTTP-proxy

HTTP-proxy is an implementation of proxy service for HTTP protocol. HTTP-proxy may be either reverse or forward.

Reverse HTTP-proxy usually lives between external network and internal network, it resolves external namespace into internal one, it is a barrier between external clients and live web-servers on the Intranet. The example is given below. Reverse HTTP-proxy is used to disguise internal network infrastructure, balance load among back-end servers, caching and HTTP responses compression. As a rule external clients have no idea that they are getting response from reverse proxy server.

Forward HTTP-proxy (aka Web-proxy) is used to reside between internal network and external network (Internet) and restrict access to specific HTTP resources, HTTP responses caching and web surfing. To make use of forward proxy the client shall explicitly specify its address (e.g. in browser settings). HTTP requests to forward proxy look like:
GET http://example.com/ HTTP/1.1
Host: example.com
Accept: */*
User-Agent: Mozilla

Note! The peculiarity of forward proxy request in comparison with direct request is that the path after GET (and any other HTTP method) is a fully qualified URL (including protocol and host part) and not just the local path to destination (starting with /).

Helicon Ape mod_proxy

Helicon Ape owns a mod_proxy module that implements both reverse and forward proxy functionality. All basic aspects of this module along with examples may be found in the docs.

Forward proxy in Helicon Ape is enabled by ProxyRequests On directive. Before enabling you need to secure your server so that only authorized users could access the proxy.

Reverse proxy is enables by ProxyPass directive. For example:

ProxyPass /app/ http://backend.domain.com/

or (the first parameter may be omitted when the directive is used inside <Location> section or .htaccess):

<Location /app/>
  ProxyPass http://backend.domain.com/
</Location>

The above config will proxy all requests starting with /app/ to backend.domain.com previously removing /app part from the path:
/app/item/33/ -> http://backend.domain.com/item/33/.

To make HTTP response headers change when reverse proxying (e.g. Location header upon redirect) ProxyPassReverse directive may be used, and to change domain names and paths in cookies the following directives are used: ProxyPassReverseCookieDomain and ProxyPassReverseCookiePath.

Now we'll illustrate you an example of non-trivial proxy application.

Example: load balancing

Given: front-end server example.com visible from external network.

Goal: Realize load balancing among three back-end application servers accounting for their performance and two back-end servers storing static files (images, CSS, etc.). Say, the second and the third back-end application servers are twice as productive as the first one, and the second back-end for static is thrice as powerful as the first one.

Solution. The reverse proxy configuration in httpd.conf will be:

<VirtualHost *:80>

ProxyPass /static/ balancer://cluster-static/ lbmethod=bytraffic

<Proxy balancer://cluster-static>
  BalancerMember http://static1.example.com/ loadfactor=1
  BalancerMember http://static2.example.com/ loadfactor=3
</Proxy>

ProxyPass / balancer://cluster-app/ lbmethod=byrequests

<Proxy balancer://cluster-app>
  BalancerMember http://app1.example.com/ loadfactor=1
  BalancerMember http://app2.example.com/ loadfactor=2
  BalancerMember http://app3.example.com/ loadfactor=2
</Proxy>

</VirtualHost>

The search of ProxyPass directive to match current request is performed subsequently, so directives with shorter matching patterns should be put lower in the config. balancer: protocol in ProxyPass directive tells that requests will be forwarded to the URLs specified in subsequent BalancerMember directives. lbmethod=byrequests parameter indicates that balancing will be based on the number of requests to back-end server; bytraffic value means that load balancing will depend on the quantity of bytes transmitted from back-end.

Compression and caching

To accelerate your proxy-server responses from the back-end may be compressed and cached. To do that we add the following line into the VirtualHost section of our htpd.conf:

# enable compression
SetEnv gzip 

# enable caching
CacheEnable mem http://app1.example.com/
CacheEnable mem http://app2.example.com/
CacheEnable mem http://app3.example.com/

Please notice that caching will only work if the response from back-end contains expiration headers; e.g., Cache-Control: max-age=60.

Conclusion

As you could see Helicon Ape mod_proxy module possesses full-fledged proxy functionality to satisfy the most exacting needs.

Best wishes,
HeliconTech Team

Tuesday, August 18, 2009

Go for SEO with Helicon Ape mod_linkfreeze

Intro

SEO, SE-friendly, search engine marketing — these words are driving mad lots of people today. Everyone wants to be SE-friendly. According to the Wikipedia, search engine optimization (SEO) is the process of improving the volume or quality of traffic to a web site from search engines via «natural» («organic» or «algorithmic») search results. In other words, SEO simplifies search robots' job thus bringing the web site to the top of the search results. Having got the idea, you would probably like to use that technique everywhere. Any new web-site of yours will be optimized for search engine. And that’s pretty good, but not good enough. We've missed something here, huh? What about existent sites? What if they are really huge and require loads of code modifications. Are they doomed to have stupid links like index.php?id=123? Do you need to spend loads of hours tinkering with a source code? Definitely NO! Right here we are going to show you an easy and powerful way to let SEO in your server without significant effort. Luckily Helicon Ape just got all needed features.

mod_linkfreeze

Like its elder brother mod_linkfreeze provides extended toolset for changing links on pages to SE-friendly format. So, in general «freezing» idea is based on HTML content modification. Once you've written special rules, the module would carefully modify every hyperlink inside each web-site page if the link matches the rules pattern(s). In a word, mod_linkfreeze turns dynamic links to the static ones. It is a primary idea of the module and at the same time a good SEO practice as long as search robots work much better with static references. And the most interesting thing here — you don’t need to modify any part of existent code. Basic concept is depicted on this scheme:
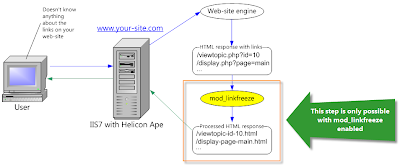
The scheme reflects the whole life cycle of a request. As you can see user goes to a web-site and IIS serves the request through the web-site engine. It doesn’t matter what the engine is. It can be Wordpress, CakePHP or even simple HTML. The important part is that the engine returns HTML response within hyperlinks and then mod_linkfreeze catches and processes the response according to its rules. Dynamic links become static and the user finally gets requested page. Without mod_linkfreeze the step inside the orange rectangle won’t exist.

You may be wondering why we expect only IIS7 on the server (see the scheme). Bad news for Windows 2003 owners — mod_linkfreeze doesn’t work under IIS6. It's just technically impossible and we hope you will enjoy mod_linkfreeze on Windows 2008 Server.

Well, let the theoretical stuff blow away and make something real — move further and demonstrate the module dealing with a real web application.

Freezing phpBB — the online forum engine

We decided to play with a forum engine because forums usually contain tons of dynamic links. Although we've taken phpBB, you may use another web-application as far as the article describes mod_linkfreeze in general.

The forum links right after installation look like this:

As you can see, there are dynamic links to PHP scripts which we want to make static. Let's enable mod_linkfreeze. First of all we have to make sure the following line is uncommented in the server configuration (httpd.conf):
LoadModule linkfreeze_module   modules/mod_linkfreeze.so
Then we should enable linkfreeze filter. The easiest way is to write the following in httpd.conf:
SetOutputFilter linkfreeze
You may try mod_mime as well, setting up the filter on a specific extension only:
AddOutputFilter linkfreeze .php
Well, now we should edit .htaccess file in the root folder of phpBB and update it as follows:
LinkFreezeEngine on
Although that wasn't actually required. LinkFreezeEngine is switched on by default. However you may use this directive to disable the module in specific context. For example you may use mod_linkfreeze for several locations only:
LinkFreezeEngine Off
<Location /foo/>
        LinkFreezeEngine on
        ...
</Location>

<Location /bar/>
        LinkFreezeEngine on
        ...
</Location>
LinkFreezeRule is the magic and power of mod_linkfreeze. This directive controls the whole process of «freezing». Basic syntax is described in the documentation. Let's see what happens if we try this:
LinkFreezeEngine on
LinkFreezeRule --- php=html

Wow, great! It works. Two simple lines and we have static links. They don't look pretty enough yet, but firstly we will sort out what's going on and then will try to get better result.

So there are three hyphens straight after LinkFreezeRule. Do you remember that dynamic links have three separators as usual? The first is a question mark (?) for query string separation, the second is ampersand (&) for query string arguments separation and the third is equality sign (=) which separates arguments names and their values. Three hyphens are needed exactly to replace these separators in the following order: ?&=. We decided to use hyphens but it wasn't necessary.

Note! It is advisable to use rarely used symbols as replacement characters, otherwise conflicts with the same characters in the URLs are inevitable. We recommend the following combinations: ---, ~~~, !!!, |||, ===, ///. The characters may also be combined, e.g.: -=-, !/=, etc.

Next part of the rule is php=html. Obviously it means extension replacing from ‘php’ to ‘html’. You might decide to use something more funny:
LinkFreezeEngine on
LinkFreezeRule --- php=aspx
The links are static but look very weird. Query string arguments go right after the extension. Moreover we want to be sure all references have lower case. For these cases LinkFreezeRule supports optional flags. MoveExt moves file extension and LowerCase casts a link into lower case. Let's try it:
LinkFreezeEngine on
LinkFreezeRule --- php=aspx [MoveExt, LowerCase]
Oh no. Our session expired while we were writing previous paragraph and phpBB added some strange argument ‘sid’. It has gone after second page reloading, but we should expect the argument again. What can we do? Happily mod_linkfreeze prepared another useful flag for us — Params. It allows to specify only needed query string arguments for «freezing». In our case it would be like that:
LinkFreezeEngine on
LinkFreezeRule --- php=html [MoveExt, LowerCase, Params="u|g|f|p|mode|id|search_id"]
See we have only two lines of code. We didn't modify any part of phpBB, we didn't tweak IIS. We just wrote a few magic words. If sometime you realize you don't need mod_linkfreeze anymore, you may just replace on with off. Huge effort, huh? :)

We've finished with phpBB. Our site is configured and ready to go on air.

The last tricks

When you setup mod_linkfreeze on your server some users will still have old bookmarks. As long as links became SE-friendly you would probably like to redirect old references to the new ones. This is beneficial for SEO as it allows to eliminate the duplicate content problem and consequent penalty in search engines. To enable redirection, please use Redirect flag:
LinkFreezeEngine on
LinkFreezeRule --- php=html [Redirect, MoveExt, LowerCase, Params="u|g|f|p|mode|id|search_id"]
Left-side screenshot displays response without Redirect flag. User gets 200. When we add the flag, user gets 301 (right screenshot).

The last thing we want to show is performance tweaking.
LinkFreezePageSizeLimit directive allows to restrict the maximum size of pages to process. mod_linkfreeze won't do anything with the part of page exceeding the LinkFreezePageSizeLimit value. By the way Google also doesn't enjoy parsing huge pages till the end. The value of directive should be specified in kilobytes:
LinkFreezePageSizeLimit 4096
And finally, NoCheckFile flag tells mod_linkfreeze not to check requested file for existence. For example if you go to http://site.com/static-link.html, by default mod_linkfreeze will check whether static-link.html exists on the disk and if it does, the module won't de-freeze the link but will return the file content instead. Omitting these checks is a good idea to boost the performance BUT only in case you're sure it won't harm you.

Summary

Well, we've done a lot with tiny effort. We described how to enable mod_linkfreeze and turn dynamic links to static ones. We've also explained the basic idea of «freezing» and told you some useful tricks.
Hope you will enjoy Helicon Ape and mod_linkfreeze!

Yours sincerely,
HeliconTech Team